Super Creamy Espresso Cheesecake


(This post may contain affiliate links at no extra cost to you. This is my way to keep this site afloat and free of ads. Read my full disclosure here.)
Our daily coffee
You won’t find a creamier and silkier espresso cheesecake. The coffee taste is very present in each and every bite, without being bitter. The filling is ultra decadent but still airy, thanks to a trick I talk about below. And I made the chocolate crust with Dutch processed cocoa powder for a more intense chocolate flavor. I’m telling you, this is the cheesecake you must have when you have your next cheesecake craving!! It’s so good and so special to me!
A few Christmases ago we bought my hubby an espresso machine. The big one with lots of shiny buttons that I wasn’t allow to touch during the early days. My husband has always bonded with our daughter over coffee because she would love the aroma when he placed his early and first cup under her nose. The upgrade to an espresso machine started to be overdue many years ago!
The quest for the perfect espresso began at that moment, learning about different kinds of beans, roasting process and the perfect grinding size. I had a good run for a year knowing exactly what I would gift my husband in any special occasion; espresso machine accessories!
And I have to tell you, he makes a mean cup of coffee. He performs a perfect choreography by grinding the beans at the perfect size, tampering the grounds tightly and evenly, pulling the shot and finally steaming a frothy milk with the perfect amount of foam on top. I’m so spoiled with that coffee ever since that machine came to our home. There’s no better compliment to him than when we are on a coffee shop and I tell him, “yours is way better”!
So, I think you can sense we are a bit obsessed with espresso here. And after many people asked for one coffee cheesecake over a poll I made on IG, I realized it was way overdue that I make it! After so many cheesecakes I have here in the blog? Not acceptable!
This one has all the right notes if you love the taste of coffee. I used a strong espresso brew plus coffee granules. You can use espresso powder if you have, but I know that’s not the easiest ingredient to find. But the espresso alone wouldn't make much of an impact, that’s why the addition of a small amount of instant coffee granules works like a charm.
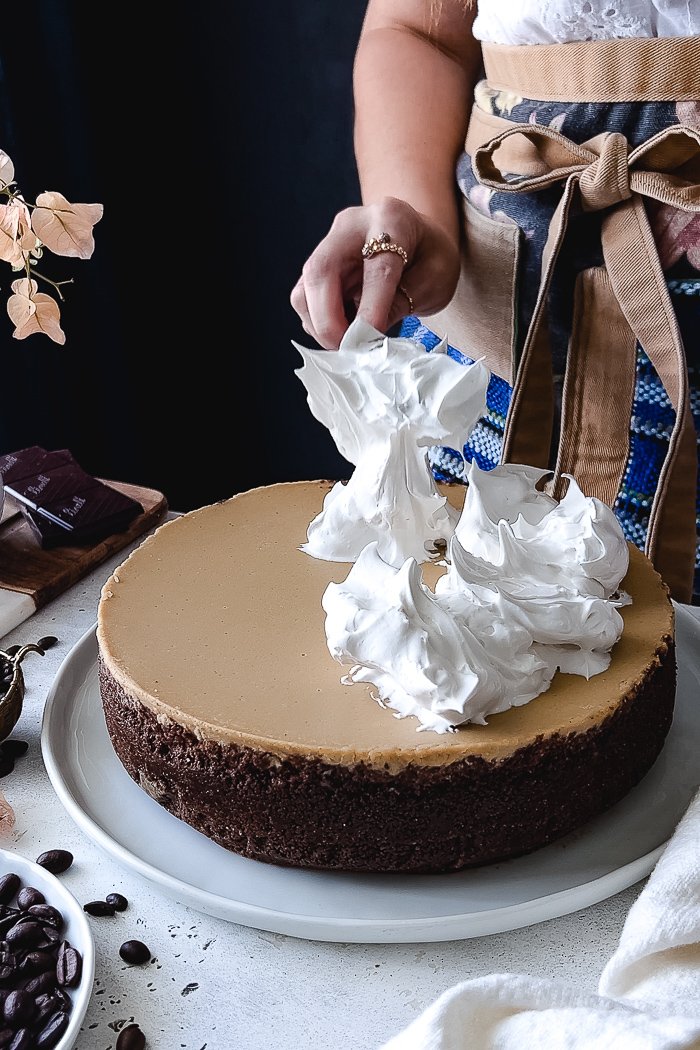
You know I love meringue over cheesecakes and especially here works like the crema on top of an espresso shot! Make every bite like a hot sip of coffee!
How to make the creamiest Espresso Cheesecake
First things first! Start by taking out the cream cheese from the fridge. They should be very soft so they mix properly into the batter and you don't end up with big lumps of cheese that can cause big bubbles. When they are already a bit soft, use a table knife to flatten them out, about half as high, so they get softer faster. If you need a shortcut, warm them in the microwave only for 10 to 15 seconds at the beginning. You don’t want separated cream cheese in your cheesecake batter.
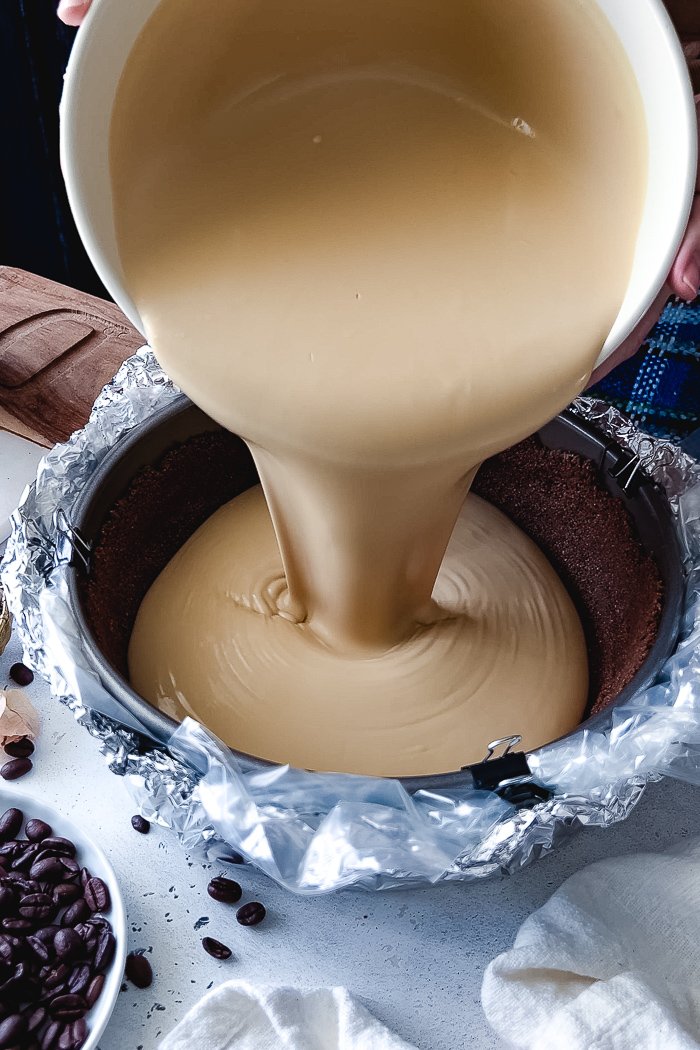
Next, prepare the springform pan. I learned this tip about wrapping the cheesecake with an oven turkey bag for baking, which I think is so clever!! I still wrapped it tightly with aluminum foil but then placed it inside the turkey bag. I used metal clips to secure the bag around the edges. It worked like a charm!! No water ran into the crust.
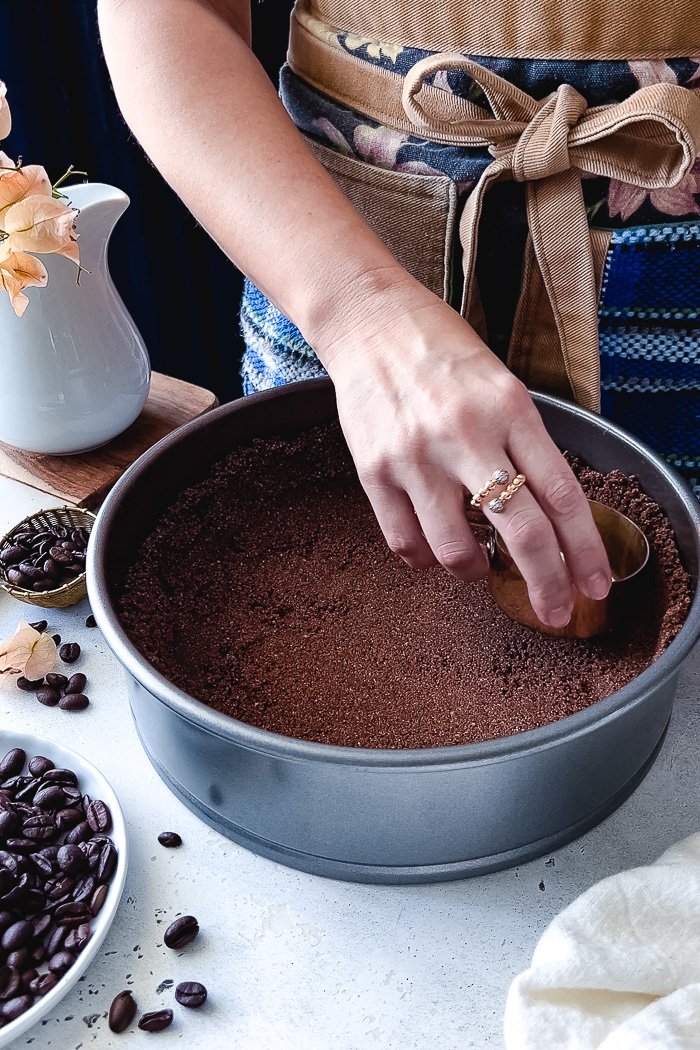
When making chocolate crust, I prefer to mix graham crackers with Dutch cocoa powder (or natural cocoa powder if I don’t have Dutch) instead of using Oreo cookie crumbs. This creates a deeper chocolate flavor that’s not overly sweet. Of course you can totally use Oreo crumbs if you happen to have some already at home. After mixing the crumbs with butter, sugar and the cocoa powder, press them to cover the inside of the pan and bake according to recipe below. Remember as soon as you take out the baked crust out of the oven, increase its temperature to 425°.
While the crust is being baked and cooled down, gather the rest of the cheesecake ingredients. See my tip on how to separate eggs and store egg whites below.
Remember that cheesecakes are a kind of custard, and custards don't like air! That’s why you need to mix gently and not too much. My best bet for having a rich and decadent but still light cheesecake is mixing with the wire attachment instead of the paddle. Mix the cream cheeses only for 2 minutes in medium-low speed. Increase the speed a notch for 10 seconds to release big chunks of cheese trapped in the wire if necessary.
For making the cream cheese filling, bring the speed to the lowest and add the rest of the ingredients according to the recipe. Super important to keep scraping the walls and bottom of the bowl at different stages to prevent big chunks of cream cheese not getting properly mixed. Pour the batter over the crust. Fill the baking sheet with water halfway through or place tray in oven and then fill it quickly with water. Transfer to oven already in 425°.
Bake for 7 minutes in 425°. Then decrease the temp to 275°. Baking cheesecakes at a lower temperature is key to getting that silky and creamy texture we all love. The cheesecake is done when the border looks set and glossy and the center is a bit wobbly. Don’t be afraid of this!
Another good idea to prevent cracking is to let the cheesecake start the cooling down process inside the turned-off oven. Drastic changes of temperature are hard on them. Leave it inside the oven with the door opened halfway for just a few minutes, then take it out and let it cool down completely before chilling.
I keep telling you, cheesecakes get creamier and silkier over time. You can totally do this cheesecake 2, 3 even 4 days in advance. You can make the toppings the same day of serving or even 1 day ahead for a totally fuss-free day of serving.
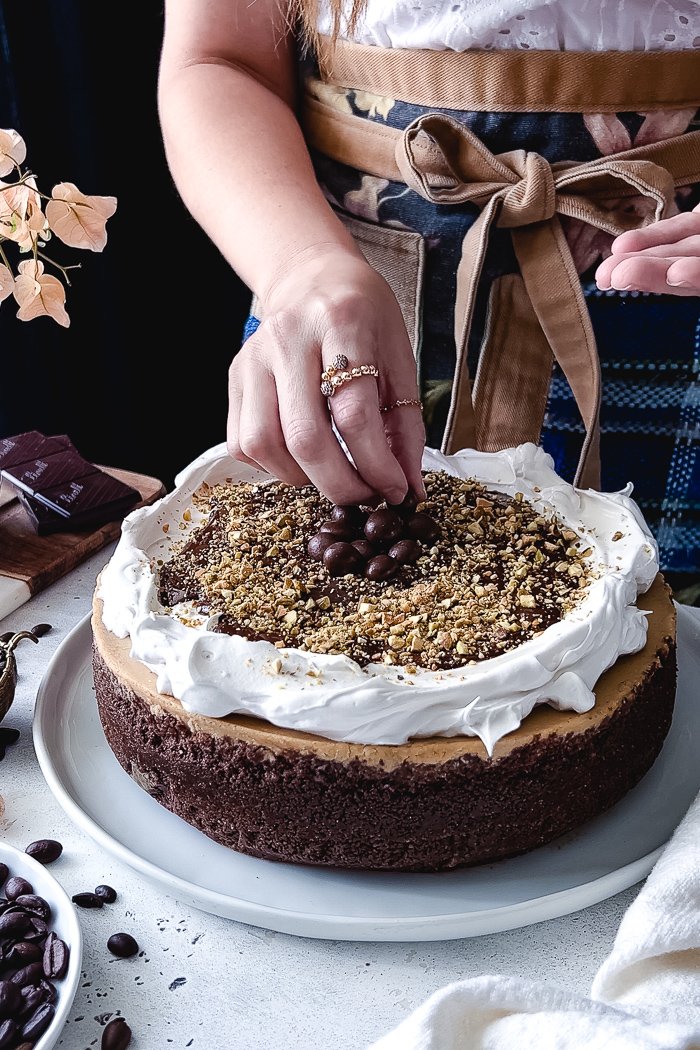
About the chocolate sauce, it’s better to pour over individual slices of cheesecake the moment you serve them because when stored in the fridge the chocolate will harden. I didn’t think about that and the chocolate went solid after chilling the cake, making it pretty challenging to cut it without the meringue bulging out. The funny thing is that everyone loved it that way because it was like candy! So, you do you with this, I just wanted to give you the heads up.
You don't need to make the meringue, it’s completely optional. You can just serve it with the chocolate sauce or a simple chocolate ganache or whipped cream on top. But you have to know that meringue and cheesecake are a match made in Heaven!
How do you separate eggs by hand quickly
My perfect trick for separating eggs with a 100% success rate (which is impressive considering how many things I have messed up!) is to break an egg on a bowl and with your hands scooping out the yolk. Let any white part drip through your fingers, then place the yolk in another bowl or directly to any batter you are working. Voilà!!! This is a completely foolproof way for separating eggs.
Can I freeze egg whites?
Yes! You can freeze egg whites and they will still be good and behave amazing when you need to use them. Most of my meringues are made with frozen egg whites. For storing egg whites in the freezer, drop each egg white in a freezer Ziplock bag and freeze them flat. Thaw them in a bowl with tap hot water. Egg whites can be frozen for months.
What you’ll need:
A sturdy 9” springform pan
Pre-cut parchment paper will make your life easier.
Flat measuring cups for pressing the crumbs on the pan.
I used this Guittard Dutch cocoa powder and it’s amazing!!
You can use oven turkey bags to prevent the bain-Marie water entering the pan.
My actual baking sheet, it’s very sturdy and always even, no matter the heat.
Candy thermometer for the meringue.
3 recipes I think you’ll love if you’re loving this one:
Biscoff Dulce de Leche Cheesecake
Easy Flourless Chocolate Cake with Coffee and Cinnamon
*
So, when are you making this?! It’s so good I know everyone will love it!! When you do take a pic, show it to everyone and tag me on Instagram @devamadeo or Facebook @DevAmadeo. Until th enext one!
(Remember to leave your email when you make a comment to receive a notification as soon as I get back to you. Don’t worry, this will not add your email to my email list.)


Super Creamy Espresso Cheesecake
Ingredients
Cocoa Crust
◯ Unsalted butter – 12 TBSP, 170g (1 ½ stick)
◯ Traditional graham crackers – 8 oz, 230g (15 whole rectangular crackers)
◯ Raw sugar – 5 TBSP
◯ Dutch processed cocoa powder (you may use natural) - 2 TBSP
Cheesecake filling
◯ Cream cheese, at room temperature – 5 (8 oz) packages
◯ Raw sugar – 1¾ cup
◯ Strong espresso brew - 4 TBSP, 55g
◯ Instant coffee granules (preferably decaf) - 1 Tsp
◯ Freshly squeezed lemon juice (optional) – 1 Tsp
◯ Vanilla extract – 1 ½ to 2 Tsps, 7g to 9g
◯ Pure full fat coconut milk, (canned) – ¼ cup, 75g
◯ Unbleached cake flour (not self-rising) or all purpose flour – 3 TBSP
◯ Eggs, at room temperature – 5, large
◯ Egg yolks, at room temperature – 2, from large eggs
Italian Meringue
◯ Water – ¼ cup
◯ Raw sugar – ½ cup
◯ Lemon - ½ Tsp, plus a slice to rub the bowl and attachment
◯ Egg whites, at room temperature – 2
◯ Cream of tartar – ¼ Tsp
Chocolate sauce:
◯ Semi-sweet or bitter sweet chocolate chips - ½ cup, about 90g
Details
Yield:
a 9” springform pan
Total time:
3 hours, plus overnight time in the fridge
Active time:
10 minutes for preparing the crust, 15 minutes for making the cheesecake filling, 10 minutes for making the meringue, 3 minutes for making the chocolate sauce.
Baking time:
1 hour and 15 minutes
Equipment:
stand mixer, 9” springform pan, medium baking dish, candy thermometer (if doing the meringue)
Steps:
Making the crust:
Preheat oven to 350°. Line a 9” springform pan with parchment paper. Wrap it almost to the top with several layers of aluminum foil (see notes above). Place over a large baking tray.
In a small saucepan place the 12 tablespoons of butter and heat over medium heat. As soon as the butter begins melting start swirling the saucepan every couple of minutes to make sure butter melts evenly. When it has melted completely, keep swirling the saucepan almost constantly, about 7 to 8 minutes. It will foam and then start turning brown. Remove butter from heat when it looks deep brown and starts smelling nutty. Let it cool down a bit.
Break the graham crackers over the bowl of the food processor already attached to its base. Add the 5 tablespoons of sugar and the 2 tablespoons cocoa powder. Pulse 2 times to integrate everything and make the crumbs smaller. With the processor running, pour in the melted butter, just until the crumbs are very fine and compact but not oily, about 10 to 15 seconds. If there are still big crumbs of crackers, integrate the crumbs stuck to the wall of the bowl and pulse a couple of seconds more.
Transfer the content to the pan. Press onto the bottom and up to the sides, until the crumbs are evenly distributed and you have reached the edges of the pan with them. You may use a bottom flat small measuring cup or utensil to help yourself press down and distribute the crumbs.
Transfer to oven and bake for 7 minutes, then let it cool down.
As soon as you take the crust out, increase oven temperature to 425°.
Making the cream cheese filling:
Place the 5 cream cheeses in the bowl of a stand mixer with the wire (whisk) attachment attached (if you are using a hand mixer use the beaters). Beat on medium-low speed (#2 in the stand mixer) until cream cheese is smooth and creamy, about 2 minutes. Stop the mixer and scrape down the sides and bottom of the bowl with a silicone spatula to make sure there are no big lumps of unbeaten cream cheese. Beat an additional minute. Scrape one more time if necessary.
(Scraping the sides and bottom of the bowl several times throughout the process is key to making the mixture smooth and bubble-free.)
Slow down to minimum speed and gradually add the 1 ¾ cup of sugar. Mix 1 minute. Add the 4 tablespoons of espresso, the teaspoon of instant coffee, and the 1 ½ teaspoon of vanilla (if using) and mix until incorporated. Add the ¼ cup of coconut milk. Stop mixer and scrape the walls and bottom of the bowl once more to make sure there are no big chunks of cream cheese. Mix in the flour just until incorporated. Add the eggs and egg yolks, one at a time. Stop beating as soon as the last yolk is incorporated. Scrape the sides and bottom of the bowl once more. Beat on minimum speed for an additional 30 seconds to one minute.
Place the pan with the crust on a baking tray. Pour in the cream cheese filling. Fill baking tray with water half way thru and carefully transfer everything to your oven already in 425° (you can do it vice versa if you prefer; transfer the tray to the oven and fill it halfway with water, but you need to act fast so the oven temperature doesn't drop much). Bake for 7 minutes. Lower the temperature to 275° and bake for 1 hour and 10 to 15 minutes, until the filling is firm but the center is wobbly when shaken.
Turn off the oven and leave the cheesecake with the oven door half open for 5 to 8 minutes, then take it out and let it cool completely. Cover the pan with plastic seal or aluminum foil (not touching the cheesecake). Chill in the fridge for 8 to 10 hours, preferably overnight.
When ready to serve, release springform pan and turn cheesecake upside down over a plate or large tray with a cling plastic paper in between. Carefully remove the bottom of the pan and the parchment paper. Place your serving plate on top and turn cheesecake once more.
Top your cheesecake with Italian meringue if you want and the chocolate sauce. Sprinkle chopped pistachios or any other nuts on top.
Making the Italian meringue:
Make sure that the mixer bowl and the wire accessory are very clean and free of any grease residue. Any fat will prevent the egg whites from rising. Move the mixer as close to the stove area as possible.
In a small saucepan pour the ¼ cup of water. Add the sugar in the middle to prevent granules sticking on the saucepan walls.
Rub the bottom, the sides of the bowl and the wires of the whisk with a lemon cut in half. Drop the ½ teaspoon of lemon juice. Add the 2 egg whites and ¼ teaspoon of the cream of tartar. Beat on low speed for 30 seconds to distribute everything. Increase speed to medium (#4 in the stand mixer) and beat until soft peaks form.
Immediately start heating the sugar and water on high heat until a candy thermometer reaches 240°. Be stand by as soon as it goes beyond 225°.
As soon as it reaches 240°, remove from heat and in a thin but continuous stream add the syrup to the whites while the mixer is still running (try to prevent pouring sugar too near to the edge). Beat for 2 minutes then increase speed to medium-high (#6 in the stand mixer). Beat for an additional 2 to 3 minutes, until the bowl feels at room temperature on the outside.
Decorate creating soft peaks or waves with a silicone spatula or upside-down spoon. You have to work the meringue relatively quick, it will look a bit broken if smeared when it’s already too cooled down, even if it’s completely safe to eat.
Drizzle chocolate sauce on top.
Making the chocolate sauce:
Place chocolate chips in the microwave and heat for 10 seconds. Move them with a stirring motion, they will loose the heat and start melting. Heat 1 or 2 more times, repeating the stirring in between. Drizzle over cheesecake when serving or over the single piece to be served.
