Mallorca Bread Buns


(This post may contain affiliate links at no extra cost to you. This is my way to keep this site afloat and free of ads. Read my full disclosure here.)
What Are Mallorcas Anyway?
(This post has been updated to include new pics and an improved recipe.)
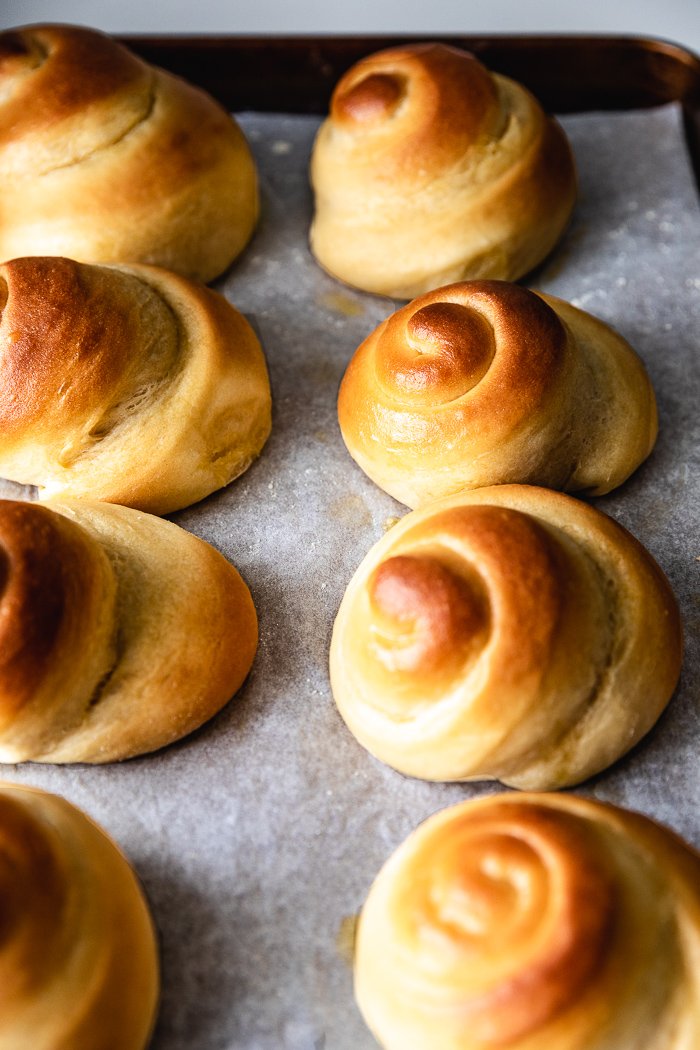
These mallorcas are so light, puffy, fluffy and anything you might think could describe eating a sweet cloud! They’ll melt in your mouth, especially when warm or toasted. Traditionally these are served with confectioner’s sugar on top, but read below where I share other delicious ways for serving, including my favorite, toasted with butter and cinammon-sugar. So many ways to use this traditional Puerto Rican bread! I’m sure you’ll love this mallorca bread recipe!
If you haven’t heard about mallorcas before you might be wondering, what the heck are mallorcas? And I got you in here! Mallorcas are a Puerto Rican sweet bread that’s eaten mostly during breakfast. It’s like our version of a croissant or a brioche! But mallorcas are sweeter and cake-ier. You’ll feel like eating sweet puffy clouds!
Mallorcas have a deep yellowish color thanks to the extra egg yolks and amount of butter in the dough. But the key word is yellowish, not yellow. When you see a bright yellow mallorca it’s probably because it has artificial coloring added to it. Same as when you see a bulky and stiff mallorca, it probably has been made with hydrogenated fats. And you know me, I eat everything, and I mean everything!! But always made with the freshest, cleanest and purest ingredients. So this is my clean and homemade mallorca’s recipe version, which I know you will love at first bite!
I have to admit that as a girl I was never a fan of mallorca bread. Shame on me, right? The idea of plain bread just with powdered sugar didn’t entice me at all. But back in high school, when you would eat anything in front of you and your jeans size will get even smaller for some strange reason, I had them in a grilled cheese with powdered sugar dusted after being toasted, another typical way to prepare mallorcas here, and that was my real high school crush! I just fell in love with them. Toasty, sweet and very cheesy!
I promise you this is a surprisingly easy recipe! It’s not chaotic and doesn't need secondary components such as frosting or fillings to enjoy them. You’ll see that most of your active time will be taking out of the fridge or serving ingredients, no complicated steps to make in advance. I just wanted to make one of those comprehensive posts to give you as much detail as possible, because if you make these right, you my friend are up to something extraordinarily delicious! Read my rundown before entering directly to the recipe so have an idea of the process beforehand.
How to make Mallorcas
I start by mixing just the flours. I needed to take out a bit to make the tangzhong mixture. After doing that, I added the salt.
Then I made the tangzhong by mixing 3 tablespoons of the flour mixture with ½ cup of water and heating a few times in the microwave until it got a pudding like consistency (specific times on the recipe below). This needs to cool down before adding to the dough. To speed up the process I placed the mixture in the fridge and stired every few minutes. As soon as it wasn’t feeling hot to the touch, I left it out to complete the cooling down process at room temperature.
Next I separated the eggs. A fool proof way to do this? Crack the egg on a small bowl, scoop out the yolk with your hand and transfer it to another bowl. Pour egg white on a freezer sealed plastic bag and freeze. Frozen egg whites work like a charm for making Pavlovas or Italian meringue. It’s easier to separate eggs when they are cold and then let them come down to room temperature.
Now I cut the butter in cubes to let it soften. They key is to not cut the pieces too thick. Since you need it softened but not warm, the time of finishing up preparing the ingredients and starting kneading the dough should be enough to make it soft. You should be able to poke it without resistance but it shouldn't look oily. If for some reason it looks oily and you are not ready for it, pop it in the fridge a couple of minutes for when it’s time to use it.
I then served the buttermilk (or milk) for it to come down to room temperature. To speed things up, I heated it in the microwave about 15 seconds, stired and let it come down to room temperature completely over the counter.
Finally for making the dough, I mixed the sugar with the wet ingredients, including the tangzhong and the instant yeast, with the paddle attachment. Then I added some of the flour mixture and kept mixing with the paddle to force the liquids into it, another key in having soft and fluffy buns. Next I added the reaming flour and changed to the hook attachment. I kneaded still in the slowest speed until the dough started looking smooth, 3 to 5 minutes. Kneading slowly makes the gluten develop slowly as well, which creates an open and tender crumb. After this, I added the butter, increased mixer to the next speed and kneaded for 20 minutes.
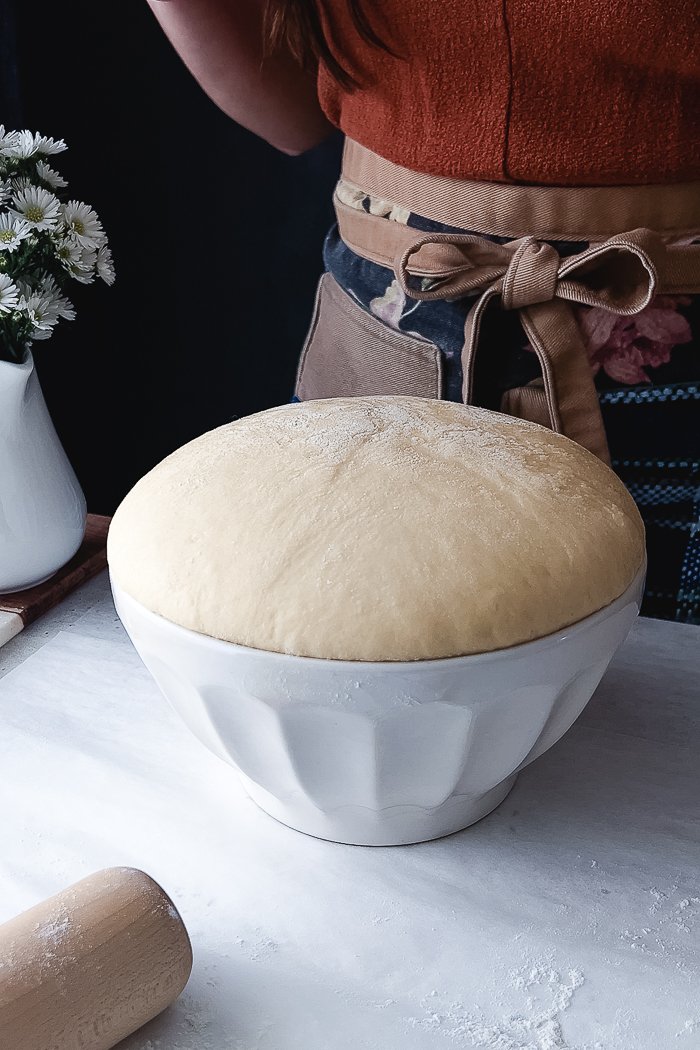
While the dough was being kneaded, I wiped with a neutral oil such as vegetable, canola or grapeseed the inside of a medium ceramic bowl (you can use glass as well).
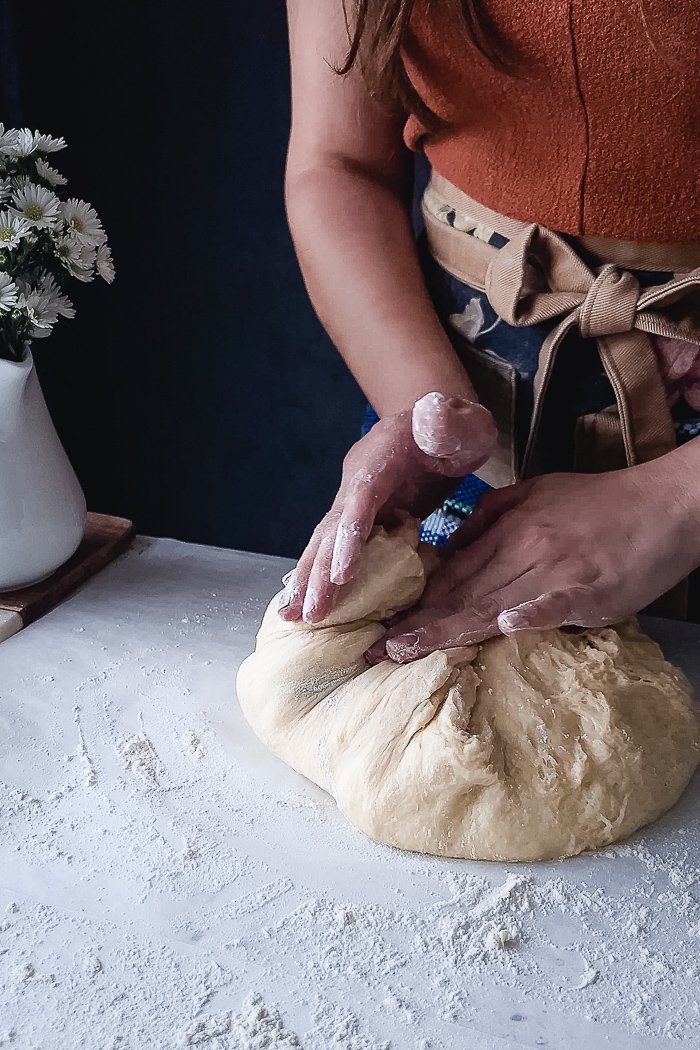
This is a pretty sticky dough. At the end of kneading it should stick to the wall of the bowl and the dough should make a large strand when the hook pulls it to the other side. From now on flour will be your friend! I kept lightly dusting my hands when handling the dough, even rubbing with a bit of flour areas of the dough that are sticking to my fingers to prevent pulling it constantly. I transferred dough to the oiled bowl and tucked in the edges to have a smooth rounded top. It should proof for about 1 to 1½ hours, until it has doubled in sized. The active time is mostly over!
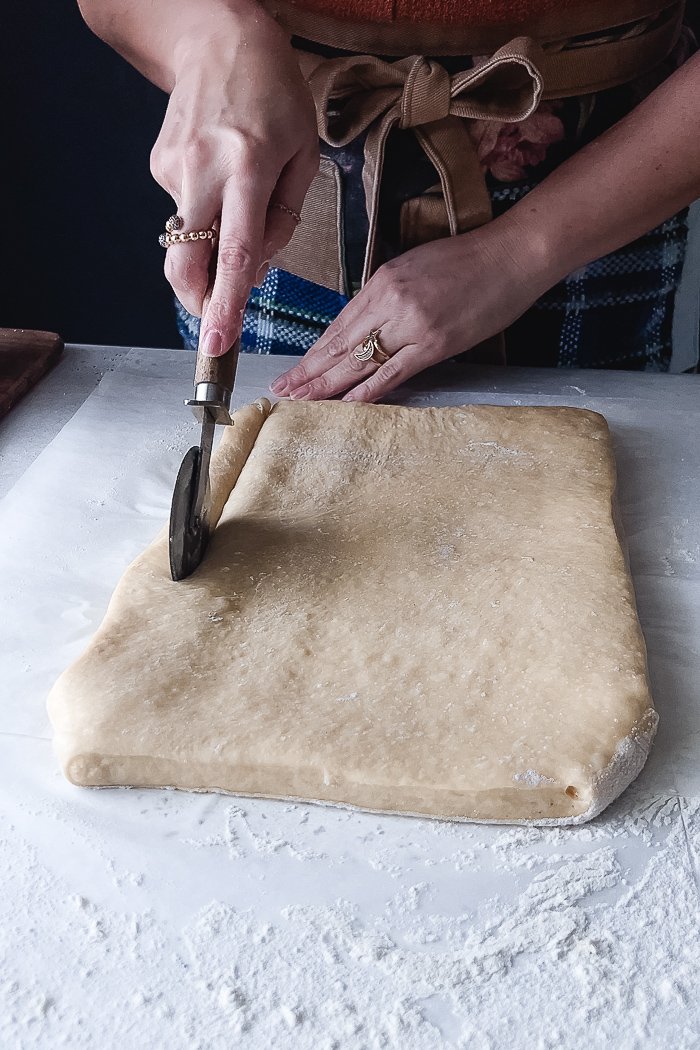
When the dough has risen, punch it in the middle to deflate and distribute the yeast. Transfer to a well floured surface and stretch until ½” thick, flouring the rolling pin and your hands whenever necessary. Shape a rectangle and cut 1” strips (you’ll probably need to rub a bit of flour every time you cut to prevent your knife or pizza cutter from sticking). Roll towards the side and tuck in the tip at the end. Arrange it on a baking sheet with parchment paper or silicon mat, leaving about 1 ½” of space between them. Let them rise again for 25 to 30 minutes. Check on them after the first 15 to 20 minutes. If the surface is starting to show up holes, they are over-proofing and you need to bake them immediately.
While the mallorcas are second proofing, preheat oven to 400°. As soon as the mallorcas are in, decrease temperature to 350° and bake for about 15 to 17 minutes, until the surface is deep yellow in color and looks matte, not shiny. In case they need more time, cover them with aluminum foil and bake for 5 extra minutes.
While the mallorcas are baking, melt some butter to brush them up as soon as they’re out.
Let mallorcas absorb the butter before sprinkling with lots of confectioner’s sugar!! If you want to taste them other ways, dust only on a few. Read below on other fun ideas for eating!
How to serve mallorcas
Sometimes you may think what are other ways to eat mallorcas, besides plain with powdered sugar on top. Here are some delicious ideas to enjoy them:
Make a grilled cheese sandwich with cheddar cheese and sweet ham or use only cheese. After pressing and toasting, dust confectioner’s sugar on top for serving. A cool variation is serrano ham with queso manchego and guava butter. Speaking of which…
Mix butter with some melted guava paste to spread inside. You may toast them or leave them puffy.
Stuff them with cream cheese and melted guava paste or pastry cream, as someone suggested on Instagram.
My favorite way of all is toasted with cinnamon-sugar. I split one and spread a bit of softened butter on both insides. Then I sprinkle cinnamon sugar on both insides as well, not too much but not too little. Close it and spread softened butter on top. Heat a griddle, melt some butter on it and place the Mallorca on top. Toast until golden brown, then flip it and press down as much as possible, as making a panini. Flip it once or twice until toasted to your likeness. Retire from heat, spread a bit of butter on top and sprinkle more cinnamon sugar!! The best!
How to store Mallorcas
Mallorcas can be stored in an airtight container or sealed plastic bag for almost a week. If you environment is pretty humid, place them in the fridge after the second day (if there are still leftovers!). Thanks to the tangzhong method that I mentioned earlier, mallorcas will be good, soft and fresh for days. You can eat them at room temperature or reheat them on a 325° toaster oven or in a griddle to have them plain or with any of the mentioned fillings.

Shop the Post
As always, I used King Arthur’s unbleached all-purpose flour and unbleached bread flour.
Do yourself a favor and invest in a good reliable kitchen scale. It’s so necessary, especially when doing breads. This kitchen scale is the one I have, it’s fully digital and has the tare function! This allows you to bring the scale to zero and keep measuring and adding ingredients in the same bowl. No need to transfer or use different bowls for each ingredient.
For this recipe I relied on my sky blue KitchenAid stand mixer.
My trusted baking sheet. This exact one has been with me for years and it’s still sturdy and conducts heat perfectly.
Precut parchment papers are a must in my kitchen. You can use the classic SilPat silicon mat as well.
My pastry brush.
Currently in love with this gold strainer set.
*
So I guess the question is, when are you going to make these mallorcas?!! And how would you love to serve them? If doing the cinnamon-sugar version, you know I’m coming over! Let me know in the comments below!
(Remember to leave your email when you make a comment to receive a notification as soon as I get back to you. Don’t worry, this will not add your email to my email list.)


Mallorca Bread Buns
Ingredients
◯ Unbleached all-purpose flour - 3 cups + 3 TBSP, 375g
◯ Bread flour - 1 cup, 163g
◯ Water - ½ cup, 118g
◯ Fine sea salt - 1 ½ Tsp, 8g
◯ Eggs, preferably organic, at room temperature - 2
◯ Egg yolks, at room temperature - 2
◯ Buttermilk or full fat milk, preferably organic, at room temperature - ¾ cup
◯ Natural granulated sugar - ½ cup, 100g
◯ Instant yeast - 11g, 1 packet, 3 ½ Tsp
◯ Salted butter, preferably organic and European style for a higher fat content (I used salted Kerrygold), cubed and softened - 8 TBSP, 113.5g, plus about 2 to 3 TBSP to be melted and brushed over mallorcas after baked
Note: If not using a scale, spoon and level your measuring cup, never overpack it with flour.
Details
Yield:
8 to 10 mallorca buns
Total time:
4 hours, including rising idle times
Active time:
20 minutes for preparing the dough ingredients, 10 minutes for shaping and rolling the dough
Proofing times:
1½ hour for first proofing
30 minutes for second proofing
Baking time:
15 minutes
Equipment:
stand mixer with hook, baking sheet with parchment paper or silicon mat, pizza cutter, dough cutter or sharp knife, pastry brush
Steps:
In a medium bowl combine the 3 cups + 3 tablespoons of all purpose flour with the cup of bread flour using a hand whisk.
Mix 3 tablespoons of the flour mixture with the half cup of water. Heat 15 seconds in the microwave. Stir. Repeat 2 - 3 more times but only for 10 seconds, until the mixture is thick and shiny with a pudding-like consistency. Let it cool down completely. If in a hurry, place it in the fridge for a few minutes to help it loose the heat and cool down faster.
Whisk into the flour mixture the 1 ½ teaspoon of salt.
In the bowl of a stand mixer with the paddle attachment combine the 2 eggs, the 2 egg yolks, the ¾ cup of buttermilk or milk, the ½ cup of sugar, the packet of instant yeast and the cooled down thick flour-water mixture. Mix for 30 seconds to 1 minutes in medium slow speed (#2 in the Kitchen Aid) until everything has smoothly blended.
Add about 1 cup of the flour mixture and mix in the slowest speed (#1) until well hydrated. You should have a shaggy dough. Change the paddle for the hook attachment. Dump the remaining flour mixture and knead in the lowest speed until all the flour has incorporated and dough starts to look smoother, 3 to 5 minutes.
Add pieces of butter, 1 or 2 at a time and waiting until one has incorporated before adding the next. As soon as the last piece of butter has incorporated, increase speed to level (#2) and knead for 20 minutes.
In the meantime, wipe a medium glass or ceramic bowl with vegetable or any other neutral flavor oil.
Flour your hands or wipe them with a bit of oil. Transfer dough to the greased bowl. Gently tuck the edges beneath the dough so you have a smooth even top. Cover bowl with a kitchen towel or cling paper and wrap it with a throw blanket or extra chunky kitchen towels. Place bowl in a warm area with no cool air drafts. Let the dough rise for 1 ½ to 2 hours, until doubled in size.
Prepare a baking sheet with parchment paper or a silicon mat.
Punch risen dough and scrape it to a dry and well floured surface. Lightly dust your hands with flour and tap the exposed dough with a bit of flour as well, especially on areas that feel sticky (keep doing this as necessary through the whole process). Fold edges in and roll dough to turn it upside down (the side that you punched should be up again). Gently tuck in dough around until you have a rectangular shape.
Stretch dough ½” thick, trying to keep the rectangular shape as much as possible. If necessary (I certainly did) cut the borders with a pizza cutter or sharp knife to make a perfect rectangle.
Using the pizza cutter or sharp knife, cut a strip of about 1”. Start rolling it towards the side, not up, tucking underneath the tip from the end side. Place the mallorca on the baking sheet. Repeat with the rest of the dough, leaving about 1 ½” of space between them. If you want, roll the cut borders as well and place them in another baking sheet. Cover again and let the mallorcas proof for 25 minutes in the same warm spot (see notes #9 to prevent over-proofing).
Preheat oven to 400°.
Place mallorcas in the oven, wait like 25 seconds and drop the temperature down to 350°. Bake for 15 to 17 minutes, until the surface looks deep yellow and matte, not shiny.
While the mallorcas are being baked, melt the 2 to 3 tablespoon of butter.
Take mallorcas out of the oven and brush them with butter through the whole surface. Let the butter be absorbed a bit before sprinkling plenty of confectioner’s sugar on top if desired.
See notes above on how to store, reheat and serve them.
